|
Setting up Mozilla Mail
In order to launch Mozilla Mail, click on the "mail
envelope" icon in the lower left-hand corner of your
browser window.
 If this icon isn't present, Mozilla mail is not
installed and you will need to download and install it.
If this icon isn't present, Mozilla mail is not
installed and you will need to download and install it.
If you have not yet set up a mail account, Mozilla's
Account Wizard will start automatically.
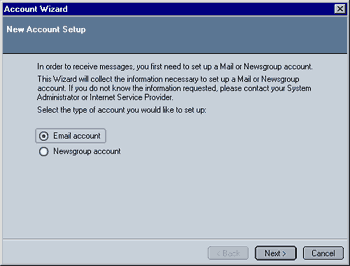
In the first screen, you can
select if you want to create a new Email or Newsgroup
account. Leave "Email Account" checked and click on
"Next" to begin setting up your Email account in Mozilla
Mail.
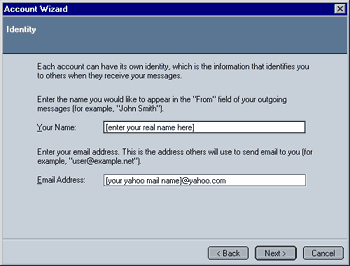
You need to enter the following
in this screen:
- Your Name: You can either enter your real name
(e.g. "John Doe") or an alias (e.g. "Johnnyboy"). What
you enter here will appear as the sender when you send
someone mail.
- Email Address: Enter your full Email Address
(without the parentheses!) here (e.g. "JohnDoe@yahoo.com").
I have chosen a "Yahoo Mail" account as an example.
Click on "Next" to continue, once you have entered the
required information.
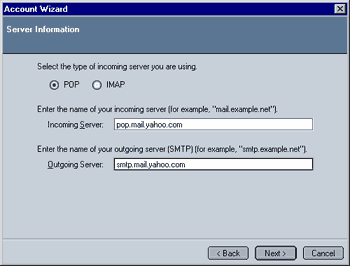
This screen is for entering the
server information. Please check with your email
provider/ISP which settings apply to your account. You
can enter/select between the following:
-
Select the type of incoming server you
are using:
- POP3: This is the server type most commonly
used.
- IMAP: Some providers offer IMAP access,
usually at a premium.
-
Enter the name of your incoming
server:
- The incoming server is the server you recieve your
mail from. In the case of "Yahoo Mail", the name is "pop.mail.yahoo.com"
-
Enter the name of your outgoing
server:
- The outgoing server is the one you use to send your
messages. Please note that incoming and outgoing
server usually have different addresses! In the case
of "Yahoo Mail", the name is "smtp.mail.yahoo.com"
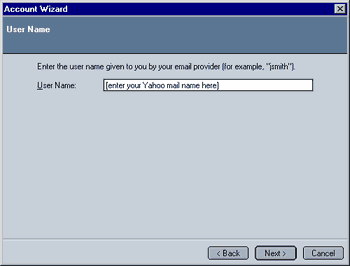
This screen is for entering your user name. Please check
with your Email provider/ISP what it is.
As a rule of thumb, it usually is the part of your Email
address before the "@something.com". In the case of our
"JohnDoe@yahoo.com" the user name would be "JohnDoe".
Make sure you enter your user name correctly as you
otherwise won't be able to access your email account
with Mozilla mail.
Note: The user name for some Email providers/ISPs
does contain the "@" symbol. In the default
configuration, Mozilla will not accept the "@"
symbol as part of your username. This can, however, be
changed by adding an entry to the "user.js" or "prefs.js"
file. Add the following line:
user_pref("mail.allow_at_sign_in_user_name", true);
Important: Make sure to read the instructions for
modifying the "prefs.js" or adding the "user.js" file
(the latter alternative is the safer one) in the "Using
Mozilla" FAQ's troubleshooting guide before
applying any changes to these files!
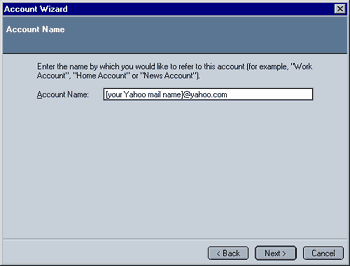
This screen is for entering your account name. The
account name will only show in Mozilla Mail, so you are
free to chose any name you prefer (e.g. your mail
account name, "Work",...). Chosing easily
distinguishable account names is only important when you
have more than one Email account.
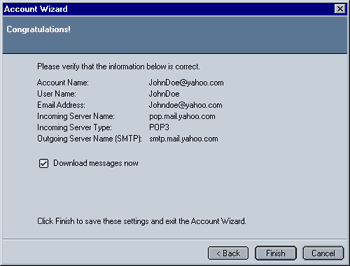
Verify that all your settings are correct. If they are,
you are almost done. If they aren't, click on "Back" to
make the necessary corrections
If you do not wish to immediately download your
messages, uncheck the option "Download messages now".
One you have verified your settings, click on "Finish"
to start using Mozilla Mail.
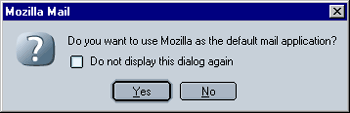
Congratulations! You can now start using Mozilla Mail.
If you want to make Mozilla Mail your default mail
application, select "Yes", otherwise "No". This setting
is system-wide, i.e. it will influence all other web
browsers. Please note that Mozilla will use Mozilla Mail
as its default mail application regardless of this
setting (please see the "Using Mozilla" FAQ for
instructions on how to change that).
Home
|